

Multistreaming doesn’t always have to be an all-or-nothing decision before you go live.
With Live Output Editing in Streamlabs Desktop, you can add or remove streaming destinations while you’re already live without ending your entire stream. Start on one platform and add more later, or stop streaming to one destination while continuing everywhere else.
Live Output Editing is a great feature for creators exploring multistreaming and it is now available exclusively for Streamlabs Ultra subs.
Keep reading to learn more about this feature and how it can make multistreaming more flexible than before.
Jump Ahead:
- What is Live Output Editing in Streamlabs Desktop?
- How to Turn On Live Output Editing?
- Things to Know Before Streaming with Live Output Editing
What is Live Output Editing in Streamlabs Desktop?
Live Output Editing is a feature inside of Streamlabs Desktop that lets you manage which platforms you’re streaming to after you’ve already gone live.
For example, you can start your stream on Twitch and decide later that you also want to go live on TikTok and YouTube. Instead of ending your Twitch stream and starting fresh, you can simply add the destinations while the original stream continues.
You can also remove an individual destination without ending your streams on the other platforms.
How to Turn On Live Output Editing?
Live Output Editing needs to be enabled before you start your stream, so make sure to turn it on during your Go Live setup.
Note: If you wish to stream to platforms with varying canvas sizes (i.e. TikTok vertical and YouTube horizontal) you need to also enable Dual Output before going live.
Step 1: Open Streamlabs Desktop and click Go Live in the bottom right corner.
Step 2: Turn on Live Output Editing by clicking the toggle in the Go Live settings window.
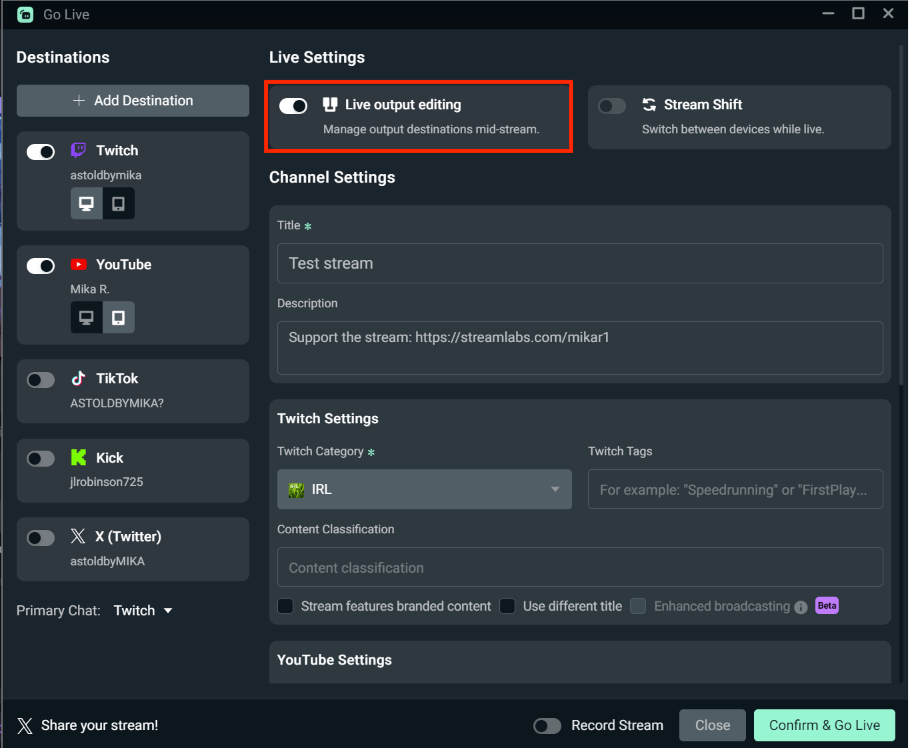
Step 3: Select the platform(s) you want to start streaming to.
Step 4: Click Confirm & Go Live to start streaming.
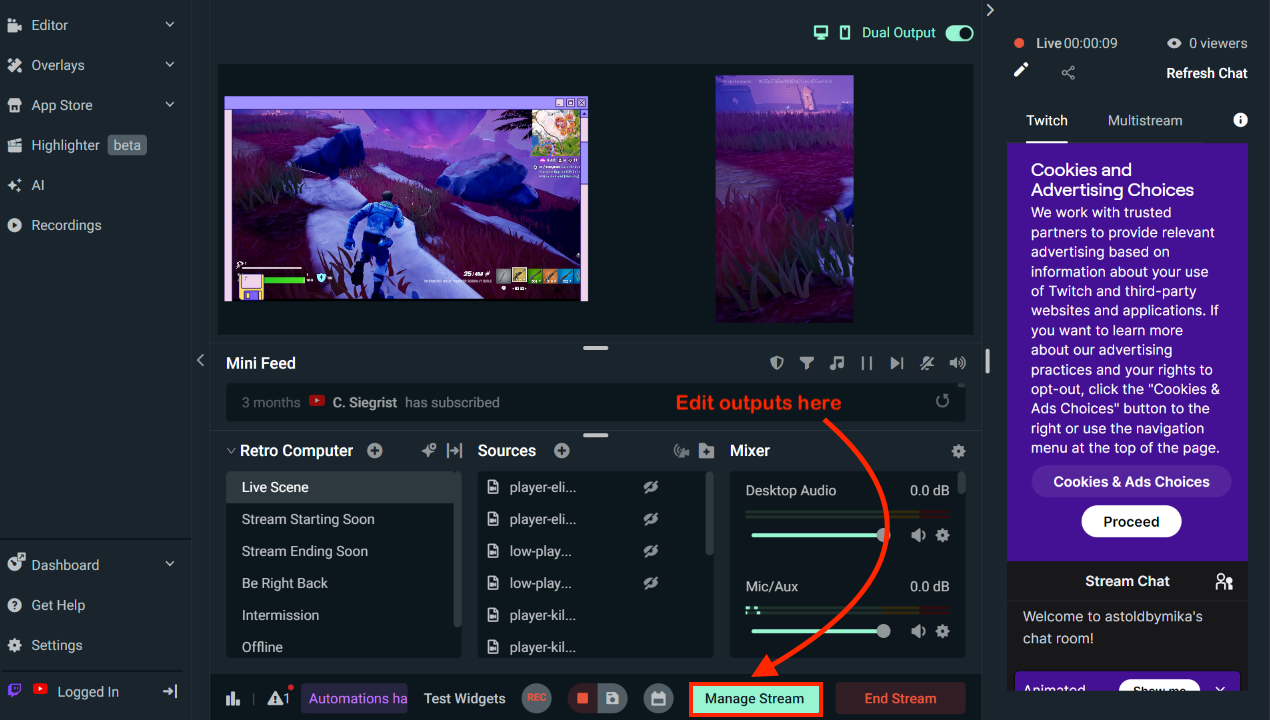
Once you’re streaming, you can update your destinations directly from Streamlabs Desktop.
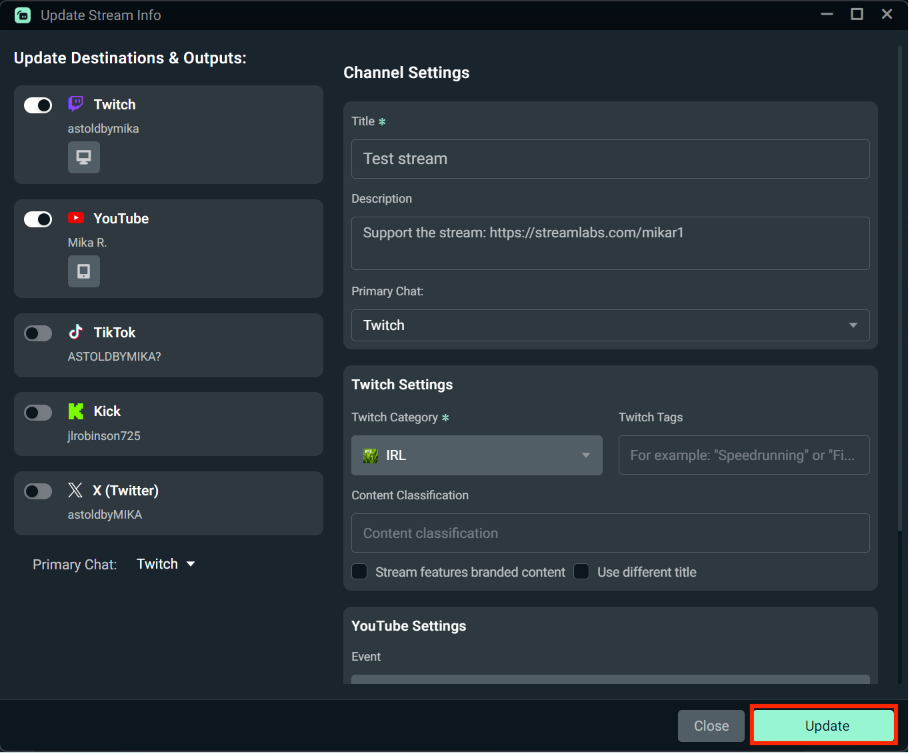
Step 5: To edit your platform destinations, click Manage Stream and toggle destinations on or off depending on what's next for your streaming session.
Step 6: Click Update to apply your changes and to keep streaming where you want, when you want.
Things to Know Before Streaming with Live Output Editing
A few important things to keep in mind:
- Live Output Editing is available with Streamlabs Ultra subs only.
- Turn it on the feature before going live. If you start streaming without enabling it, you’ll need to end your stream and start again before you can use Live Output Editing.
- Live Output Editing and Stream Shift can’t be used at the same time.
- If you want to manage both horizontal and vertical destinations, make sure Dual Output is enabled before you go live. If you start without Dual Output enabled, streams for that session will be limited to the horizontal orientation.
- Live Output Editing can manage both horizontal and vertical destinations when Dual Output is enabled, but it can’t be used for a stream made up only of vertical destinations.
Live Output Editing gives you the flexibility to start streaming where you want, add more destinations when it makes sense, and adjust your multistream setup without restarting your entire broadcast.
Open Streamlabs Desktop and enable Live Output Editing before your next stream to manage where you go live without any interruptions. .
If you have any questions or comments, please let us know by contacting us or joining our Discord server.
0 Comments